
How to enable universal print from start to finish and some good tips wile at it!
Universal Print is included in most of Microsoft 365 corporate licenses and can be used to manage printers for cloud-native Windows devices. A natural step for normal print scenarios. The setup is pretty straight forward, let me walk you trough it!
Topics discussed in this blogpost:
- License requirements
- Prerequisites
- How to install the connector
- Publish printers to Universal Print
- Share the printer – to all or specific groups
- Automate deploying printers using Intune
- User experience
- Troubleshooting
- PowerShell Module
- Decommission Universal Print
- Useful links
Prerequisites
To print using Universal print solution, client devices needs to ensure the below prerequisites:
- Windows version 1903 or later. (Windows server is not supported).
- macOS 13.3 or later.
- Client device must be allowed to access below endpoints:
- Print service = https://print.print.microsoft.com/
- Registration service = https://register.print.microsoft.com/
- Discovery service = https://discovery.print.microsoft.com/
- Notification service = https://notification.print.microsoft.com/
- Graph service = https://graph.print.microsoft.com/
- Microsoft Entra ID = https://login.microsoftonline.com/
- Resource/Audience uri for access token = https://print.print.microsoft.com
- Entra joined or Entra hybrid joined devices.
Currently the administrator needs license to manage Universal Print, this is a big miss form Microsoft! In Universal Print Feature Requests there is a post from 2021 regarding this and current status is “Looking into it”. You can vote on this topic there and let Microsoft know this needs to be prioritized! Remove requirement of license for administrators.
License requirements
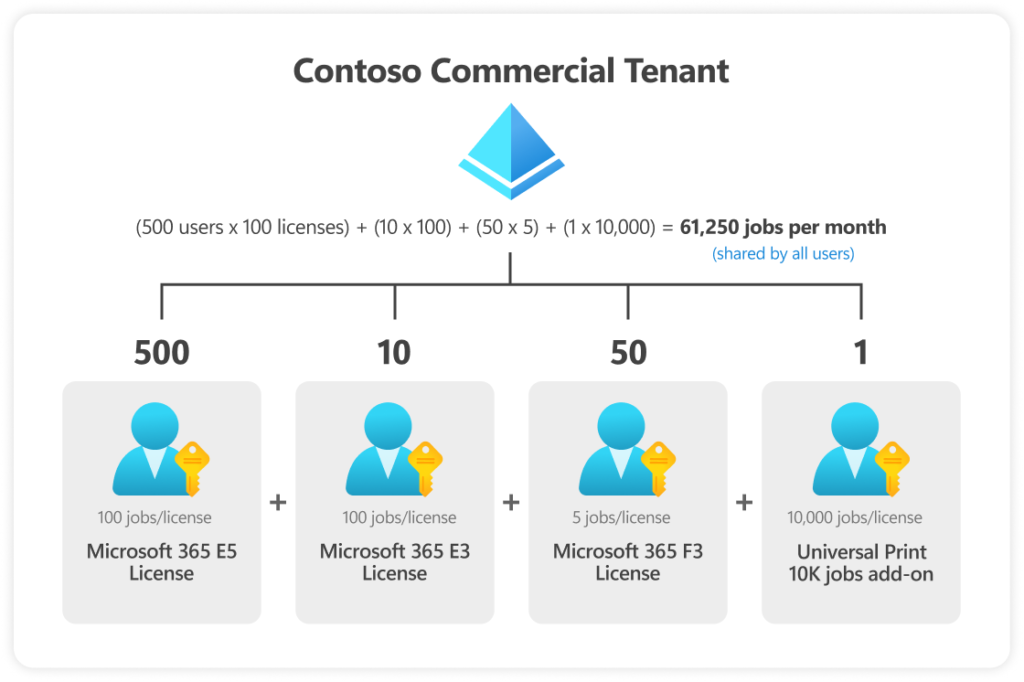
Universal print is included in Microsoft 365 Business Premium and above, the main difference is how many print jobs you have available per month and user. Furthermore Microsoft provides a add-on for more print jobs.
The print jobs are pooled and divided by all users for reference see the following diagram:
How to install the connector
To connect the printers to Microsoft Entra you need to install a connector.
The connector is called Universal print connector and can be downloaded from http://aka.ms/upconnector this will download the latest version of the connector.
Install the connector on one of your on-premise print servers.
Publish printers to Universal print
After downloading and installing the connector you will need to login to your Microsoft tenant, the account needs to be a Printer administrator or Global administrator.
Give the connector a name and now you and select witch printers should be published.
Share the printer – to all or specific groups
Navigate to Universal Print – Microsoft Azure and click Mange then Printers.
Each individual printer added to universal print can be either shared to all or specific groups depending on your needs. to do this click on the printer you want to share and click share, in the next step select if the printer should be available for all users or specific groups, se details below:

Automate deploying printers using Intune
The end user that has access to the printer can add them trough “Printers & Scanners” by themselves or we can create a configuration policy in Intune and deploy the printer automatically.
This is done utilizing the “PrinterProvisioning CSP” found here: PrinterProvisioning CSP | Microsoft Learn
To deploy a printer trough Intune we need to create a configuration policy:
- In https://intune.microsoft.com, go to Devices > Configuration.
- Click Create > New Policy and choose the following:
- Platform = Windows 10 and later
- Profile type = Settings catalog
- Click Create
- As Name, enter a name for the configuration
- Click Next
- Click Add settings
i. Now enter “Printer Provisioning” in the search box and click Search to
the right to filter out all related policies, then check Printer Shared ID
(User) and then click X (Close).
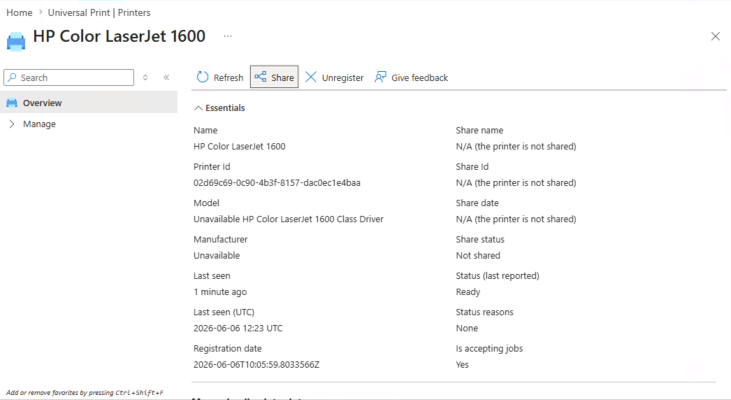
ii. In a new browser or tab, browse to https://aka.ms/UPPortal.
iii. Expand Manage and click Printers and then click on the printer you want to deploy.
iv. The values displayed for Name, Printer Id and Share Id will be used in
the Intune policy
v. Go back to the Intune tab.
vi. Enter the Printer Id in the Cloud Device ID (User) field.
vii. Verify that Install is selected in the Install (User) field.
viii. Enter the shared name in the Printer Shared Name
(User) field. - Enter the Share ID in the Shared ID (User) field. and then click Next.
- On the Scope tags select scope if you need, click Next again.
- On the Assignments page, choose the group you want to deploy the printer to er add all users and click Next, followed by Create.
- Wait a few minutes and the printer will be deployed on your device/devices.
User experience
If you deployed the printer automatically for the users trough Intune the printer will appear in Printers & Scanners and the user can start utilizing the printer.
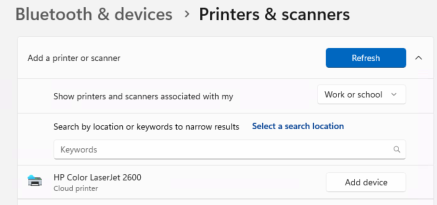
If you set the printer as available for all but not automatically deployed as mentioned above the users need to add the printer themselves.
This is done by going to Printer and scanners and clicking “Add a printer or scanner” then toggling Work or school and then “Add device” on the printer that they want to install. This will install the printer and drivers on the device.
Troubleshooting & Montioring
Some common things to check for:
- First to check: the users need to have a Universal Print license assigned to utilize universal print
- The universal print connector logs evens in Event viewer found here: Applications and Services Logs > Microsoft > Windows > PrintConnector > Operational
- Windows devices store information about the printers in: HKEY_CURRENT_USER\Software\Microsoft\PrinterProvisioning\UPPrinterInstalls
- Microsoft has provided a extensive troubleshooting guide Troubleshooting – Universal Print | Microsoft Learn
- Monitoring of utilization and print jobs can be done in the Universal print portal > Monitor > Usage and reports this gives us insights in deployed printers, remaining print jobs and utilization
PowerShell Module
Universal Print has a dedicated PowerShell module “UniversalPrintManagement”.
The UniversalPrintManagement PowerShell module is designed for managing and administrating Universal Print resources from the command line.
It can be used to:
- Install-Module UniversalPrintManagement – Install the module
- Connect-UPService – Connect to Entra
- Get-UPPrinter – Get information about a single or list of printers
- Set-UPPrinterProperty – Update mutable properties of a printer
- Grant-UPAccess – Grant print access to a user or group or all users in the organization
- Get-UPAllowedMember – Get information about users and groups that have print access to a specific printer
- Get-UPConnector – Get information about a single or list of connectors
- Remove-UPConnector – unregister connectors
###Share all printers###
Import-Module UniversalPrintManagement
connect-uPService

$printers = get-upprinter
foreach($printer in $printers.results){
    new-upprintershare -PrinterId $printer.id -ShareName $printer.displayname -confirm
}
###Grant all users access to shared printers###
Import-Module UniversalPrintManagement
connect-uPService
$Shares = Get-UPPrinterShare
foreach($share in $shares.results){Grant-UPAccess -ShareID $share.id -AllUsersAccess}###Remove all Shares###
Import-Module UniversalPrintManagement
connect-uPService
$shares = get-upPrinterShare
foreach($share in $shares.results){remove-upprintershare -ShareID $share.id -confirm}Above are some examples of the capability’s of the module for complete reference visit PowerShell Module – Universal Print | Microsoft Learn or use Get-Command -Module UniversalPrintManagement to see available commands.
Decommission Universal Print
Prepare to remove a connector
- Navigate to Universal Print in the Azure Portal.
- For all printers registered from the connector you wish to remove
- If the printer is shared, delete the printer share.
- Unregister the printer
- Restart the “Print Connector service” (PrintConnectorSvc.exe) on the connector PC to clean up locally-stored data about the printers.
Unregister the connector
Once printers on the connector are no longer shared or registered in Universal Print, the connector can be unregistered from the Universal Print PowerShell module.
Launch an elevated PowerShell window.
- Run Install-Module UniversalPrintManagement.
- Run Connect-UPService and sign in to Universal Print. NoteThe account used to sign in must be a Global Administrator or Printer Administrator and must be assigned a Universal Print license.
- Remove the connector by using the Remove-UPConnector cmdlet and passing it the ID of the connector you wish to remove.
- Restart the “Print Connector service” (PrintConnectorSvc.exe) on the connector PC to clean up locally-stored data about the connector.
Finally uninstall the connector application
Uninstall the connector app from the PC where the connector is installed. You can either uninstall the connector app from the Apps section in the Windows Settings app, or from Programs and Features in the Control Panel.
Useful links
- Set up Universal Print | Microsoft Learn
- https://learn.microsoft.com/en-us/universal-print/fundamentals/universal-print-remove-connector-howto
- Troubleshooting – Universal Print | Microsoft Learn
- PrinterProvisioning CSP | Microsoft Learn
- Debugging print errors – Universal Print | Microsoft Learn
- Known Issues – Universal Print | Microsoft Learn
- Print job journey – Universal Print | Microsoft Learn
- Supported print options – Universal Print | Microsoft Learn
- PowerShell Module – Universal Print | Microsoft Learn
Leave a Reply